When buying a new electric guitar you’d probably think
that it would be in top-notch playing condition as soon
as you pull it out of the box. And while every set-up
inspection before
shipping, the fact remains that your new guitar is made
of wood…..and wood moves! Temperature and humidity both
effect wood and by the time your guitar gets to you it
may need a minor adjustment or two. Additionally, as
your guitar ages, you may have to perform periodic
adjustments in order to keep your guitar in good playing
condition. This is normal for all guitars, in
general.
The following tips concern general, basic
set-up…however, if you are not sure of what is being
described here or are not sure of your capability to
carry out the instructions, do yourself a favor and take
your axe to a qualified guitar technician.
ADJUSTING THE TRUSS ROD:
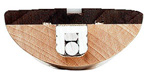
All electric guitars have an adjustable metal truss rod
that runs down the center of the neck. (Figure 1)
The truss rod adjustment can be both simple and complex
at the same time. On the simple side, a minor adjustment
to straighten a neck with too much concave bow or to
relieve a convex bow is possibly all that is needed to
make a dramatic improvement to your guitars playability.
On the complex side, adjusting the rod alters other
aspects of the set-up such as overall action, string
height and intonation.….and YOU CAN DAMAGE YOUR GUITAR
PERMANENTLY IF THE ADJUSTMENT IS NOT MADE CORRECTLY. If
you feel confident that you can make this
adjustment…read on.
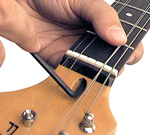
-
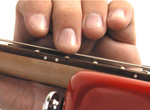
Place a capo at the first fret. (Figure 2)
-
Press the low E string down at the 17th fret.
(Figure 2)
-
Look for a small gap of (approximately .010” or
0.25mm) between the top of the 7-9th fret and the
underside of the string. (Figure 2)
-
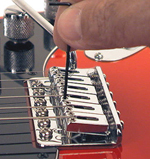
If there is too much gap, the truss rod needs to be
turned clockwise. (Figure 3)
-
If there is not enough gap, the truss rod needs to
be turned counter clockwise. (Figure 3)
TIPS:
-
Never force the adjustment if it feels tight.
-
Make any adjustment in very small degrees at a time.
-
Let the neck “settle” between adjustments.
-
If you are not clear on these instructions, take
your guitar to a qualified technician.
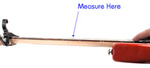
SETTING THE ACTION/STRING HEIGHT:
Once you are sure your truss rod has been adjusted
properly, you will want to adjust the action or string
height to insure the best playability. String height is
measured at the 12th fret.
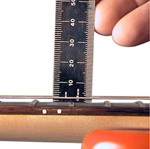
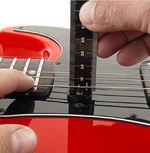
-
Using a steel ruler, measure the action on the top
and bottom strings. (Figure 4)
-
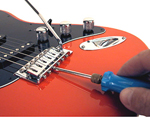
Adjust the bottom string (low E) to 2.00mm and the
top string (high E) to 1.5mm by raising or lowering
the saddle. (Figure 5)
-
Set the middle strings by gradually increasing the
height from treble to bass side. (Figure 5)
SETTING INTONATION:
Most electric guitars provide individual string length
adjustment for setting intonation. Fine tuning this
length insures that your guitar plays in tune all the
way up and down the neck.
-
Using an electronic tuner, tune your guitar to
pitch.
-
One string at a time, play the harmonic at the 12th
fret (Figure 6) and then play the fretted 12th fret
note.
-
If the fretted note is sharper than the harmonic,
increase the string length slightly until both notes
register the same on your tuner. (Figure 7)
-
If the fretted note is flat compared to the harmonic
shorten the string length slightly until both notes
register the same on your tuner. (Figure 7)
-
Repeat the procedure on all strings until the
harmonic and the fretted notes are the same.
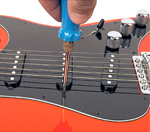
SETTING PICK-UP HEIGHT.
Pick-up height can greatly effect your guitars output.
The closer to the strings the pick-up is, the more
output you will get but….if the pick-up is too close the
strings, problems can occur with magnetic pull.
-
Fret the outer strings (one at a time) at the top
fret. (Figure 8)
-
Measure the distance from the top of the pick-up to
the underside of the string. (Figure 8)
-
Adjust so there is between 2.5mm and 3.00mm. (Figure
9)
And there you have it! In theory the actions described
above are simple but in reality they can be very tricky.
The staff of MusicYo suggests that your first attempt at
these operations be made in the presence of someone who
has done them before to insure you don’t make an
instrument altering mistake